Preparing your Raspberry-Pi
This sections describes the steps required to prepare your Raspberry-Pi for running LinuxCNC 2.8.4 with the HUB75HAT. You can also choose to use one of the ready-made images, in which case you can skip these steps. The available images are listed in the table below.
Linux version |
LinuxCNC version |
username/password |
link |
remarks |
|---|---|---|---|---|
Debian Buster (32-bit) |
LinuxCNC 2.8.4 |
cnc/linuxcnc |
||
Debian Bookworm (64-bit) |
LinuxCNC 2.9 |
cnc/tuxcnc |
Read text file on Desktop |
Flashing a real-time OS
Follow these steps to install Debian Buster with a real-time kernel on your Raspberry-Pi. This recipe has been posted on the LinuxCNC forum by elovalvo.
Download from www.raspberrypi.com an image of stable legacy version of Raspberry Pi OS Buster and install to a SD card (with Raspberry Pi Imager or similar).
Update the OS:
sudo apt update
sudo apt upgrade
Install the realtime kernel (5.15.65-rt49) (source: https://github.com/kdoren/linux/releases):
sudo su
cd /tmp
wget https://github.com/kdoren/linux/releases/download/rpi_5.15.65-rt49/linux-image-5.15.65-rt49-v7l+_5.15.65-1_armhf.deb
apt install ./linux-image-5.15.65-rt49-v7l+_5.15.65-1_armhf.deb
KERN=5.15.65-rt49-v7l+
mkdir -p /boot/$KERN/o/
cp -d /usr/lib/linux-image-$KERN/overlays/* /boot/$KERN/o/
cp -dr /usr/lib/linux-image-$KERN/* /boot/$KERN/
[[ -d /usr/lib/linux-image-$KERN/broadcom ]] && cp -d /usr/lib/linux-image-$KERN/broadcom/* /boot/$KERN/
touch /boot/$KERN/o/README
mv /boot/vmlinuz-$KERN /boot/$KERN/
mv /boot/initrd.img-$KERN /boot/$KERN/
mv /boot/System.map-$KERN /boot/$KERN/
cp /boot/config-$KERN /boot/$KERN/
cp /boot/cmdline.txt /boot/$KERN/
cat >> /boot/config.txt << EOF

[all]
kernel=vmlinuz-$KERN
# initramfs initrd.img-$KERN
os_prefix=$KERN/
overlay_prefix=o/$(if [[ "$KERN" =~ 'v8' ]]; then echo -e "\narm_64bit=1"; fi)
[all]
EOF
Optimizing kernel (source: https://gnipsel.com/linuxcnc/rpi4-11-emc.html) by opening
cmdline.txtsudo nano /boot/$KERN/cmdline.txt
And adding
isolcpus=,2,3 idle=pollto the end of the string. To close the file, pressCtrl+X,yandEnter.
We recommend restarting your Raspberry-Pi to ensure that the changes to take effect.
Installing LinuxCNC
Follow these steps to install LinuxCNC 2.8.4. This recipe has been posted on the LinuxCNC forum by elovalvo.
Add the LinuxCNC Archive Signing Key to your apt keyring
sudo apt-key adv --keyserver hkp://keyserver.ubuntu.com --recv-key 3cb9fd148f374fef
Add the apt repository (link):
echo deb http://linuxcnc.org/ buster base 2.8-rtpreempt | sudo tee /etc/apt/sources.list.d/linuxcnc.list
echo deb-src http://linuxcnc.org/ buster base 2.8-rtpreempt | sudo tee -a /etc/apt/sources.list.d/linuxcnc.list
Update the package list from linuxcnc.org and install LinuxCNC
sudo apt-get update
sudo apt-get install linuxcnc-uspace linuxcnc-uspace-dev
Installing LiteX-CNC
Litex-CNC can be installed using pip:
pip3 install litexcnc[cli] --user
Note
The suffix [cli] is required to install the command-line interface. Without
this suffix the scripts referenced in this documentation will not work.
To install the Litex-CNC driver for LinuxCNC, use the following command:
sudo env "PATH=$PATH" litexcnc install_driver
Optionally, one can also install the toolchain required to build the firmware on the Raspberry-Pi. When this step is omitted, the firmware has to be compiled on a different computer.
litexcnc install_toolchain --user --architecture arm --os linux
Note
This description is specific for Debian Buster, which is a 32-bit operating system.
When using a newer version of Debian, it might be a 64-bit version, in which case
the switch --architecture arm64 should be used instead. You can check whether
you have a 32-bit or a 64-bit operating system by running uname -a in the terminal.
Enabling SPI
The SPI peripheral is not turned on by default. There are two methods to adjust
the settings, either by using the command-line (raspi-config) or by using the
GUI.
Using the Desktop GUI
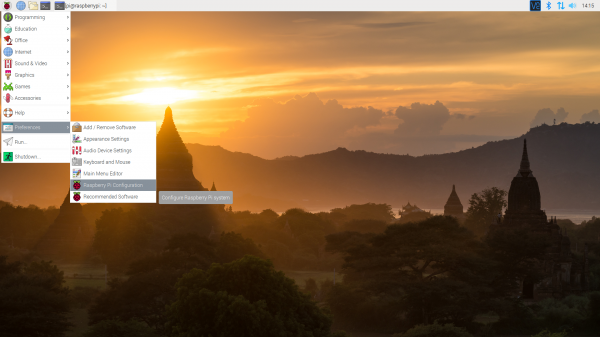
You can use the Desktop GUI by heading to the Pi Start Menu > Preferences > Raspberry Pi Configuration.
A window will pop up with different tabs to adjust settings. What we are interested is the Interfaces tab. Click on the tab and select Enable for SPI. At this point, you can enable additional interfaces depending on your project needs. Click on the OK button to save.
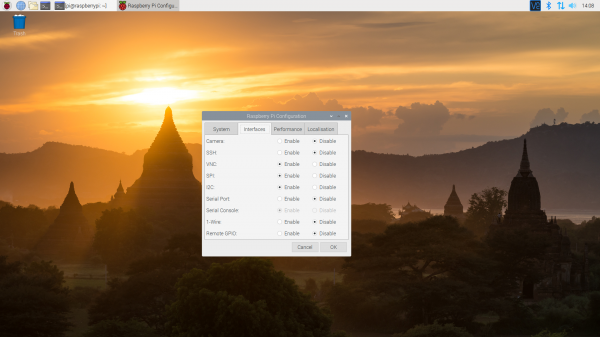
We recommend restarting your Pi to ensure that the changes to take effect. Click on the Pi Start Menu > Preferences > Shutdown. Since we just need to restart, click on the Restart button.
Using the command-line
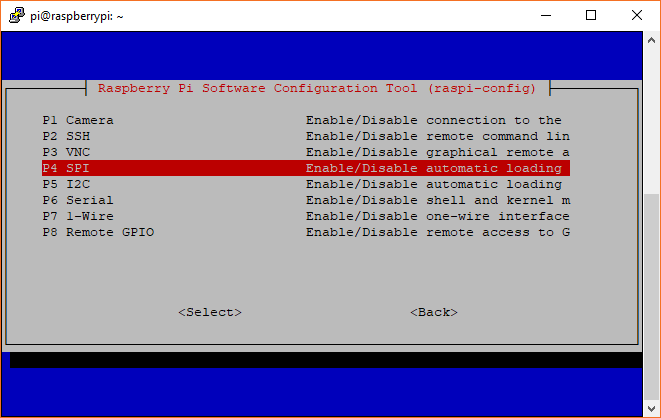
If you are using a terminal, you will need to:
Run
sudo raspi-config.Use the down arrow to select 5 Interfacing Options
Arrow down to
P4 SPI.Select yes when it asks you to enable SPI,
Also select yes if it asks about automatically loading the kernel module.
Use the right arrow to select the <Finish> button.
Select yes when it asks to reboot.
The system will reboot. When it comes back up, log in and enter the following command:
ls /dev/*spi*
The Pi should respond with:
/dev/spidev0.0 /dev/spidev0.1
These represent SPI devices on chip enable pins 0 and 1, respectively. These pins are hardwired within the Pi. Ordinarily, this means the interface supports at most two peripherals, but there are cases where multiple devices can be daisy-chained, sharing a single chip enable signal.
Enabling UART
THe HUB75HAT has two RS-485 connectors, which are powered by the RaspeberryPi UARTs 0 and 5. To use the RS-485 communication additional steps are required.
UART0
By default, the primary UART is assigned to the Linux console. If you wish to use the primary UART for other purposes, you must reconfigure Raspberry Pi OS. This can be done by using raspi-config:
Start raspi-config:
sudo raspi-config.Select option 3 - Interface Options.
Select option P6 - Serial Port.
At the prompt Would you like a login shell to be accessible over serial? answer ‘No’
At the prompt Would you like the serial port hardware to be enabled? answer ‘Yes’
Exit raspi-config and reboot the Raspberry Pi for changes to take effect.
To switch the Bluetooth function to use the mini UART, and makes the first PL011 (UART0)
the primary UART, add the following lines to /boot/config.txt:
enable_uart=1
dtoverlay=miniuart-bt
core_freq=250
After rebooting the RaspeberryPi, one can check the whether messages can be sent using UART0 by sending a test-message:
sudo echo "Hello world" > /dev/ttyAMA0
Sometimes one can experience Permission denied problems when executing the command above. In
this case there is most likely another process using UART0. One can disable this service by running
the following command and rebooting the RaspberryPi.
sudo systemctl mask serial-getty@ttyAMA0.service
UART5
UART5 is located on GPIO pins 12 (RX) and 13 (TX). To enable UART5 add the following
line to /boot/config.txt:
dtoverlay=uart5
UART5 can be found under /dev/ttyAMA1.
Example usage
An example usage of the UARTs is the non-realtime component for Huanyang VFDs.
hy_vfd --device /dev/ttyAMA1